Been waiting for Nuxt 3.0 to build Jamstack (static) apps? No need for that. The latest Nuxt version — v2.14 may be just what you are looking for.
Curious? 😉 Let’s start.
What is Jamstack?
For anyone who was not familiar, Jamstack (or JAMstack) is a web development architecture in which JAM stands for client-side JavaScript, reusable APIs (instead of multiple web servers), and prebuilt Markups (static HTML files).
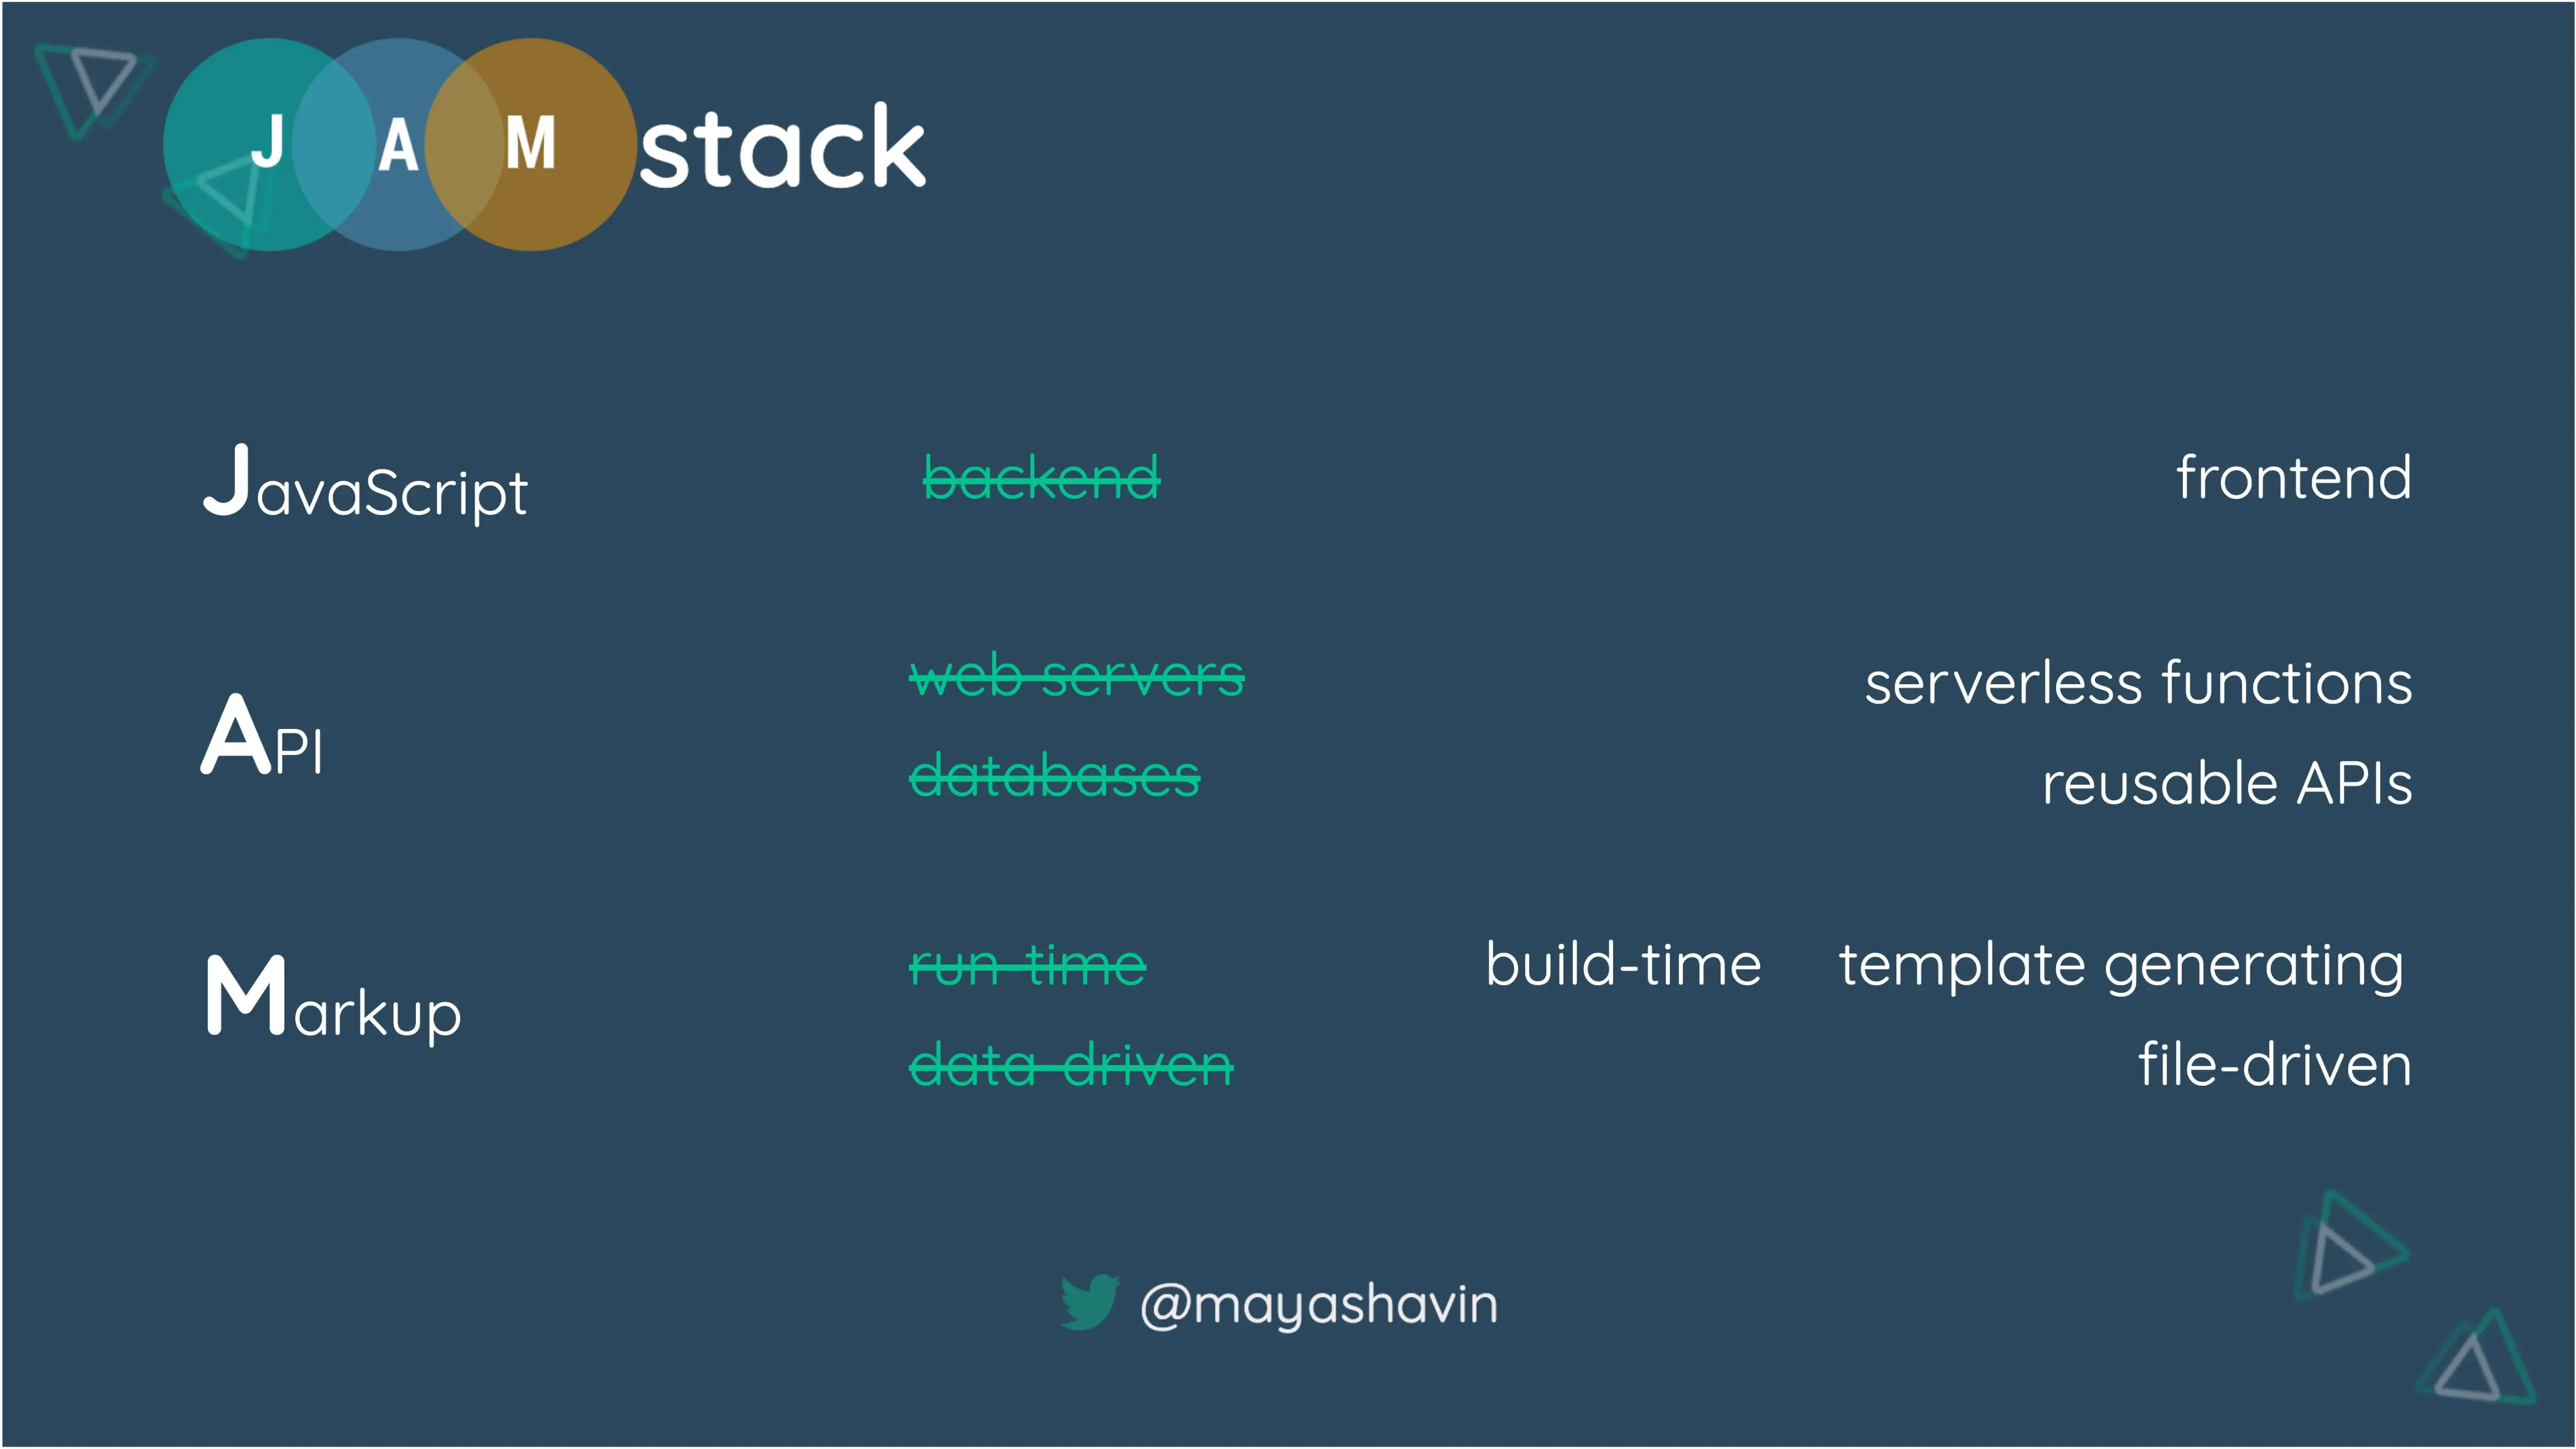
Jamstack aims to deliver faster, scalable and more secured apps by having them built as “static”. The trend of Jamstack starts in 2019, and we expect it to continue its popularity in 2020 🔥.
So how does Nuxt — a server-side (SSR)Vue framework — currently perform with Jamstack?
Let’s find out.
The status of Nuxt for Jamstack (before v2.13)
Nuxt is a super cool framework. It offers two following build mode for a single codebase:
universal(SSR — Server-side rendering)spa— Single Page Application
Later on to support Jamstack, Nuxt team offers additional build command nuxt generate to act as static site generator (SSG).
Nevertheless, its static site generator mechanism is not exactly 100% expected for a standard Static Site Generator (SSG), with some following limitations:
- Unlike normal SSG, where all data for a page are pre-fetched on build time, Nuxt engine pre-renders templates and contents on build-time but retrieves external data on run-time using
fetchandasyncData. Thus, the generated pages are only half static. Also, by relying on external calls to complete data fetching and rendering on the client-side, there may be delays in displaying content to the user, affecting the app’s overall performance. - Since Nuxt doesn’t have any built-in Data Layer like GraphQL, the Nuxt engine doesn’t know how to auto-generate all dynamic routes for contents from an external database. Developers have to specify how to generate these routes using
generate.routesproperty innuxt.config.jsfile. This extra work leads to complexity and possible slow building time, resulting in cost efficiency, especially when most hosting services like Netlify charges based on building time. - There is no built-in markdown support. We can use the
@nuxtjs/markdownitmodule; however, this module proves to be difficult for developers to perform extra customization.
Thus, the power of static sites on performance, in this case, is unleashed half-way.
But with Nuxt 2.13 onwards and Nuxt Content Module, these limitations are finally over.
Full static starting from the build process
For better developer experience, since v2.13, Nuxt introduces a new property - target: static while mode remains universal (as default) or spa within nuxt.config.js, to inform the Nuxt engine, our application aims to be entirely static.
/* nuxt.config.js */
export default {
 mode: 'universal', // default mode
 target: 'static', // enable full static mode
 //...
}
Optimize build with nuxt generate
Before Nuxt v2.13, to build a code project as static, we use nuxt generate. By calling nuxt generate, the Nuxt engine actually triggers nuxt build to start the build process and then exports the application’s pages to static HTMLs before deploying.

From version 2.14, nuxt generate is smarter. It detects when there is no code changed and skip the build step. Instead, it reuses the previous build cache and continues generate static HTMLs.
Also, Nuxt engine knows to detect, separate any extra async API call on client-side (by asyncData or fetch) from the generated HTML pages into payload .js file(s) accordingly. Hence it reduces the size of the generated HTML pages served significantly. Simultaneously, on run time, the payload files will then be pre-loaded, making the app performance-optimized and eliminating the extra API calls on client-side navigation.

Great, isn't it? The next question is: Why do we need keeping cache for building static apps?
Adding cache support to the build process reduces unnecessary repetitive work for redeployments. The first deployment requires a full build-building of code and templates into application files using and exporting them to required static HTMLs for deploying.

However, the full build is not optimal to run in later redeployments unless there is a change in code and templates. In most circumstances, there will be changes in the site contents, such as adding a new blog post, modifying product content, etc. We will only need to re-generate the dynamic routes or/and HTML for these specific content. Hence running full build can lead to cost inefficiency, especially when static hosting services mainly charge us based on the building time. For such use cases, to optimize the building time for redeployment, using cache of the previous build and only generating the new content updates is sufficient, rather than the full cycle.

You mention the dynamic route, Nuxt auto-crawls it
Since v2.13, Nuxt brings in something more powerful than the need of one Data Layer, and generate.routes. As long as you mention your dynamic route on any page (list of blog posts on the main page, for instance), the Nuxt crawler will detect and make sure all the mentioned routes are pre-generated during build and deployment.
By default, the Nuxt crawler is auto-enabled. Nevertheless, if we want to use our logic for generating routes, we can turn it off by setting crawler: false and continue implementing export.routes in nuxt.config.js
Cool, isn’t it? And there is more. Nuxt v2.14 is excellent, and with its Nuxt Content module, its static power is even higher.
Let’s check out Nuxt content, shall we?
You write the content, Nuxt takes care of rendering
Nuxt Content module - @nuxt/content is a new module developed by Benjamin Canac from the Nuxt team. At the time of writing this post, Nuxt Content releases version 1.4.1.
In short, this content module acts as a Git-based headless CMS (Content management service) to fetch and handle content from different file types located in a local project directory, to use in your Nuxt application.
To start using Nuxt Content, run one of the following commands
yarn add @nuxt/content

#OR
npm i @nuxt/content
Then add the module to modules list in nuxt.config.js
modules: [
 '@nuxt/content'
]
And the module is ready for you to use.
A simple way to use
By default, the Nuxt engine will use content/ part as the main directory for all the markdown files.
The Content module globally injects $content function instance to our application so we can use it to fetch content from a given path directly. For example, we can retrieve a list of blog posts from content/blog directory as below:
/* pages/blog/index.vue */
export default {
    async asyncData({ $content }) {
        const pages = await $content('blog') //will be understood as 'content/blog'
                         .fetch()
      return { pages }
    }
}
This $content instance receives two arguments: path and an additional object options which provides extra configuration for the module to override the default settings for that given path. For instance, we only need to enable deep: true to fetch files from sub-directories, as in the following code:
/* pages/blog/index.vue */
export default {
    async asyncData({ $content }) {
      // get all files located in 'blog/' directory, including sub-directories
        const pages = await $content('blog', { deep: true })
                         .fetch()
      return { pages }
    }
}
Or to fetch a single file, we can either pass the file name to the path argument, or directly as options
export default {
    async asyncData({ $content }) {
        // will be translated to 'blog/posts/article-1'
      const page = await $content('blog', 'posts/article-1')
                         .fetch()
      return { page }
    }
}

/* OR */
export default {
    async asyncData({ $content }) {
      const page = await $content('blog/posts/article-1')
                         .fetch()
      return { page }
    }
}
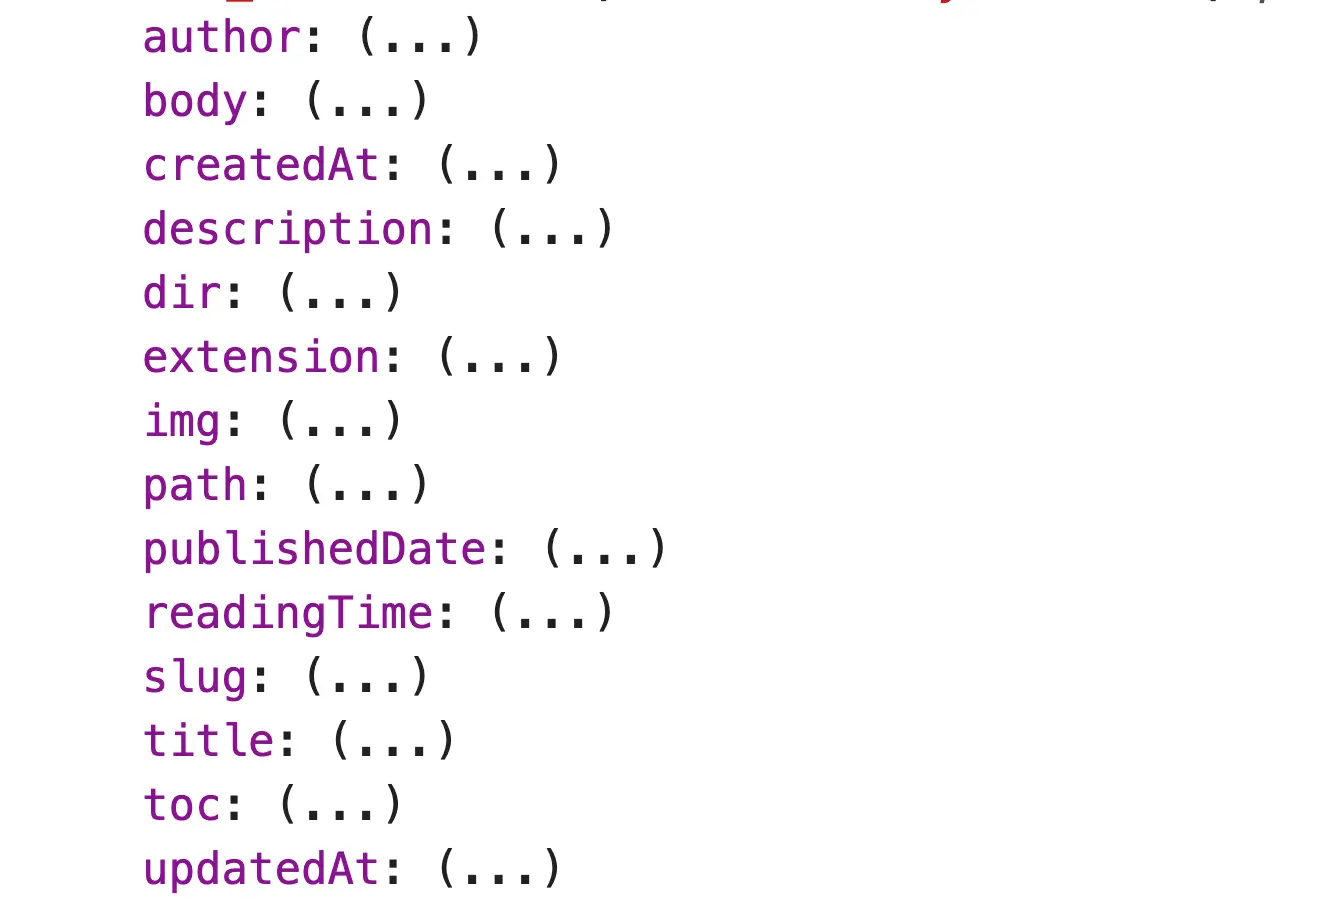
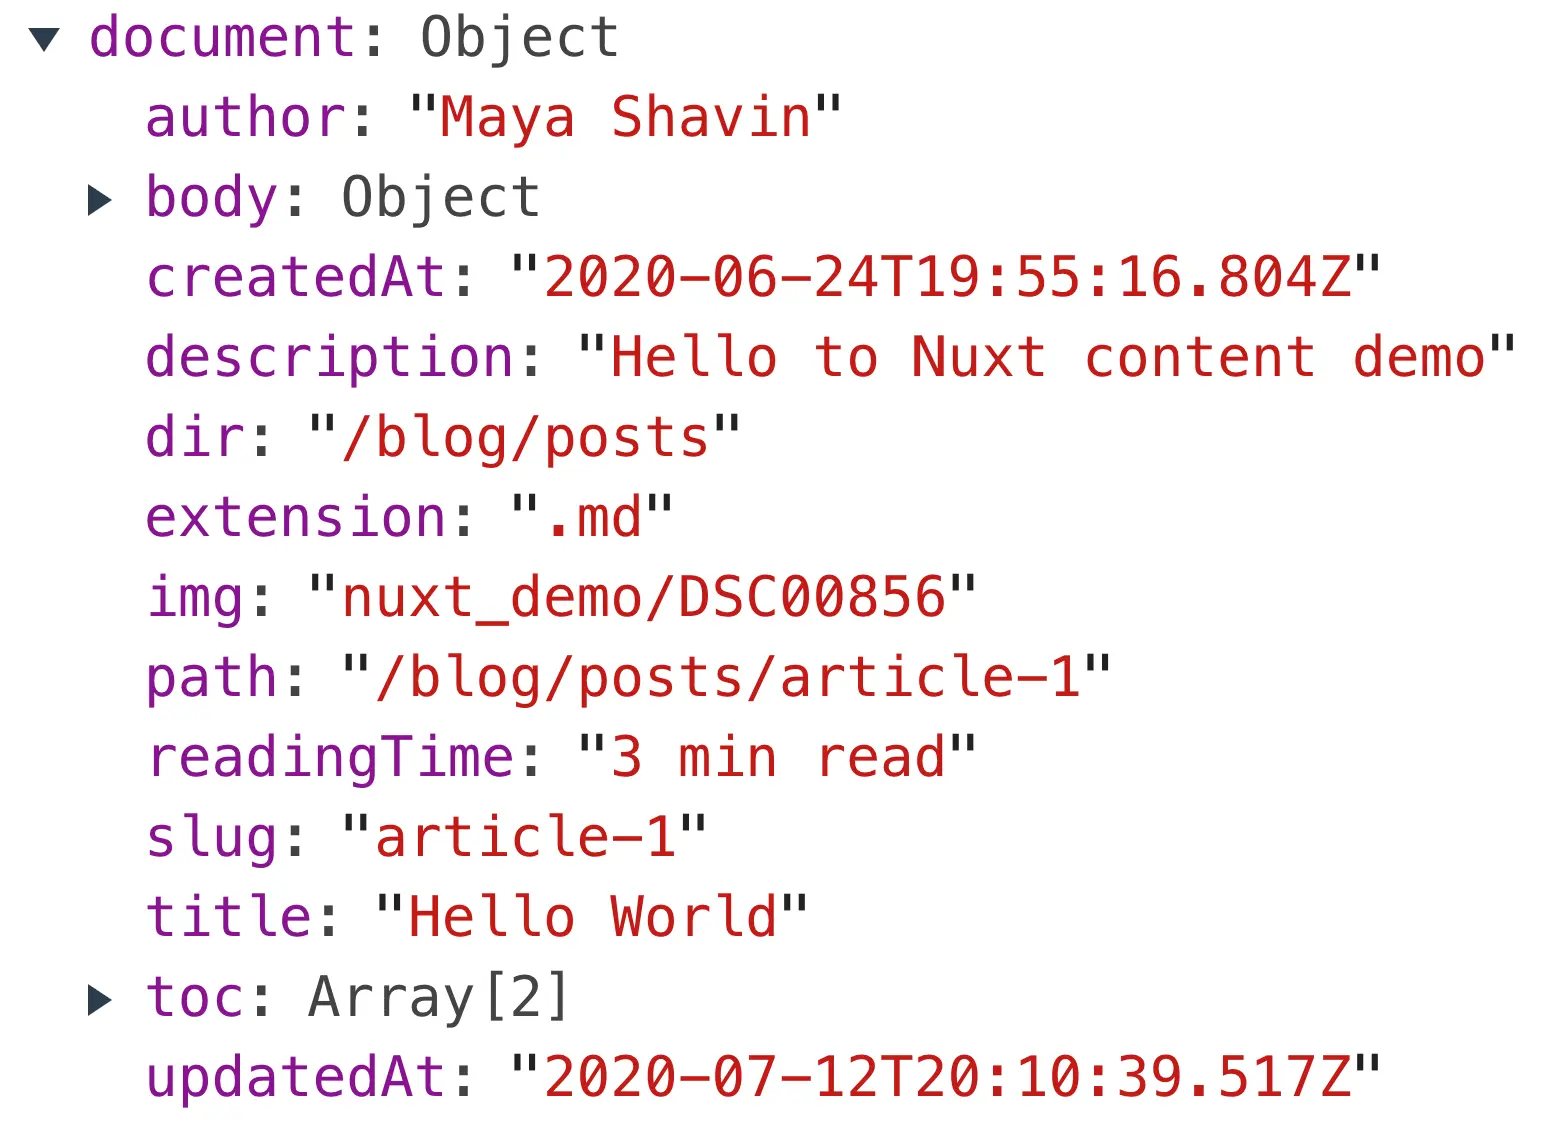
Both approaches are legitimate. $content() returns a chain sequence, of type QueryBuilder . We then can call its method fetch() to start retrieving the content using Promise.
When fetch() resolves, it returns either an Object (if path is a single file path), or an Array of Object (if path is a directory). Each Object has the similar structure as in the screenshot below, with the auto-generated properties as body - the main content, createdAt, dir, extension, path, slug - name of the file, toc - table of contents, updatedAt
Once we have the return content object, we can simply use nuxt-content component in the template section to display the content's body:
<!--Post.vue-->
<template>
  <article class="mx-2">
        <h1>{{ page.title }}</h1>
    <p class="italic">{{ page.description }}</p>
    <nuxt-content :document="page" />
  </article>
</template>
That's it. The content module will take care of the rendering and have your page content displayed, as in the below example:

As you can see from the screenshot, Nuxt Content only displays the content with the most basic stylings (aka - no styling), to avoid creating complexity when applying CSS style customization. Nuxt provides us .nuxt-content class selector for <nuxt-content> component, and we can start customizing the styles from there, such as:
.nuxt-content h1 {
  font-size: 2.25rem;
  font-weight: 600;
  margin-top: 1rem;
  margin-bottom: 1rem;

  // OR simply by TailwindCSS
    // @apply text-4xl font-semibold my-4;
}

.nuxt-content h2 {
  font-size: 1.875rem;
  font-weight: 600;
  margin-top: 0.5rem;
  margin-bottom: 0.5rem;

    // Or with TailwindCSS
  // @apply text-3xl font-semibold my-2;
}

.nuxt-content a {
    color: #cc0f01;
  text-decoration: underline;

    // Or with TailwindCSS
  // @apply text-tfh underline;
}

.nuxt-content p {
  padding-bottom: 0.5rem;

    // Or with TailwindCSS
  // @apply pb-2;
}
And our content page now looks much more organized
And that's it. We have our content from a markdown file rendered to a page using Nuxt Content module with only three simple steps:
- Fetch the content using
$content().fetch() - Render the fetched content using
<nuxt-content>and its propdocumentaccordingly. - Add CSS styles to the displayed content using class selector
.nuxt-content
Great? Indeed. So any other unique features Nuxt Content offers besides?
Search & Filtering content results
Since Nuxt Content is using LokiJS and mongoDB-like query syntax, we can achieve a high performance in searching and filtering a certain set of content results with a sequence chain of methods. For example, if we want to pick only the title, slug, updatedAt properties of each content object, and sort the posts by the edit time (descending order), we can do as follows:
export default {
 async asyncData({ $content }) {
  const pages = await $content('blog', { deep: true })
   .only(['title', 'slug', 'updatedAt'])
   .sortBy('updatedAd', 'desc')
   .fetch()

  return { pages }
 }
}
In which only receives an array of keys to pick from each returned content object, and sortBy accepts two arguments - a key to sort and the sorting direction.
You can also filter for posts that match certain condition(s) using where, such as:
export default {
 async asyncData({ $content }) {
  const pages = await $content('blog', { deep: true })
   .only(['title', 'slug', 'updatedAt'])
    // filter articles with same title "Hello World"
   .where({ title: 'Hello World'})
   .fetch()

  return { pages }
 }
}
Or perform a full-text search on a field with search(key, value):
export default {
 async asyncData({ $content }) {
  const pages = await $content('blog', { deep: true })
   .only(['title', 'slug', 'updatedAt'])
    // search for article with exact title "Hello World"
   .search('title', 'Hello World')
   .fetch()

  return { pages }
 }
}
Also, you can implement pagination by limiting the results received by limit():
export default {
 async asyncData({ $content }) {
  const pages = await $content('blog', { deep: true })
   .only(['title', 'slug', 'updatedAt'])
   .limit(10) //only fetch 10 posts
   .fetch()

  return { pages }
 }
}
You can explore other useful chaining methods in Nuxt Content documentation and LokiJS for query syntax supported in these methods.
🔥Note here that all the sequence chaining has to end with fetch() to collect the needed data through Promise API.
Code highlighting with PrismJS
Nuxt Content uses PrismJS as its built-in handler for code highlighting in markdown content. The default theme is pretty decent; however, we can always install prism-themes and chose a different theme from the available theme list (24 different themes) to use in our application:
yarn add prism-themes
Then define the desired theme under content.markdown.prism field in nuxt.config.js, as shown in the example below:
/* nuxt.config.js*/

export default {
  //...
    content: {
    markdown: {
       prism: {
        theme: 'prism-themes/themes/prism-a11y-dark.css' //Use A11y-dark theme
       }
      }
  },
  //...
}
And your rendered content with code highlighting will look like:
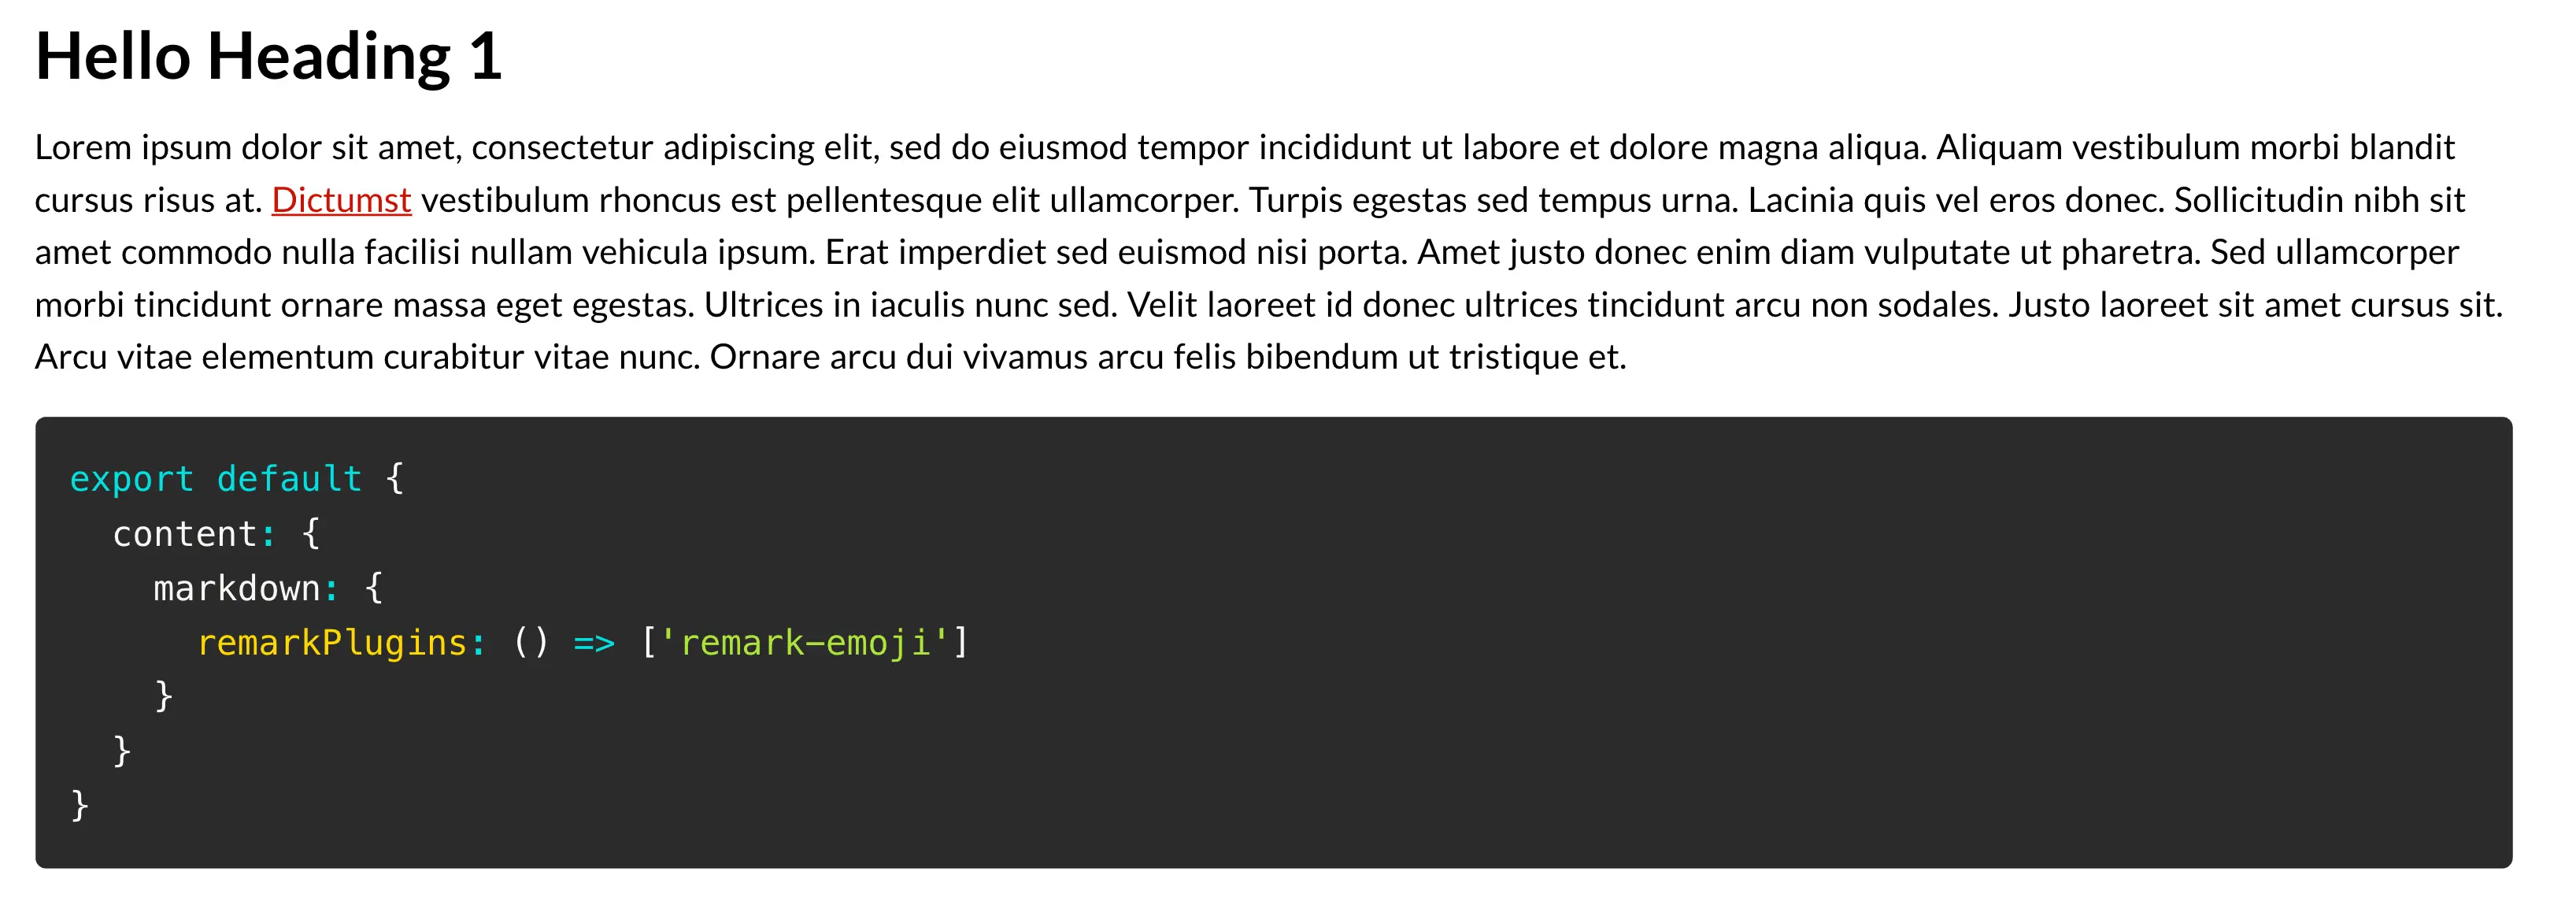
Beautiful, isn't it? No more complicated workaround for supporting code highlighting for markdown 😃. Also, you can always create your custom theme as the prism-themes repo is open-source 🤞!
YAML inside Markdown
One nice feature of Nuxt Content is the ability to support YAML front matter block within a markdown file, as long as it appears at the top and takes the valid form of YAML set between triple-dashed lines:
---
title: Hello World
description: Hello to Nuxt content demo
img: nuxt_demo/DSC00856
author: Maya Shavin
---
The Nuxt Content module will inject these fields as properties into the content object passed to document of nuxt-content component, as shown in the example below:
Writing YAML block inside the markdown file enables us to easily add more custom information, such as author details, for a blog post.
Auto generating table of content
When fetching a markdown file, Nuxt content auto generates a table of content (TOC), which consists of all the heading titles inside the file. The TOC is an array and appears as a property of the return content object. Each element of the toc array is an Object with three main fields:
id- the heading title itself in lowercase and free of whitespace, for linkingdepth- type of heading (1 - h1, 2 - h2, etc)text- the actual text of the heading title.
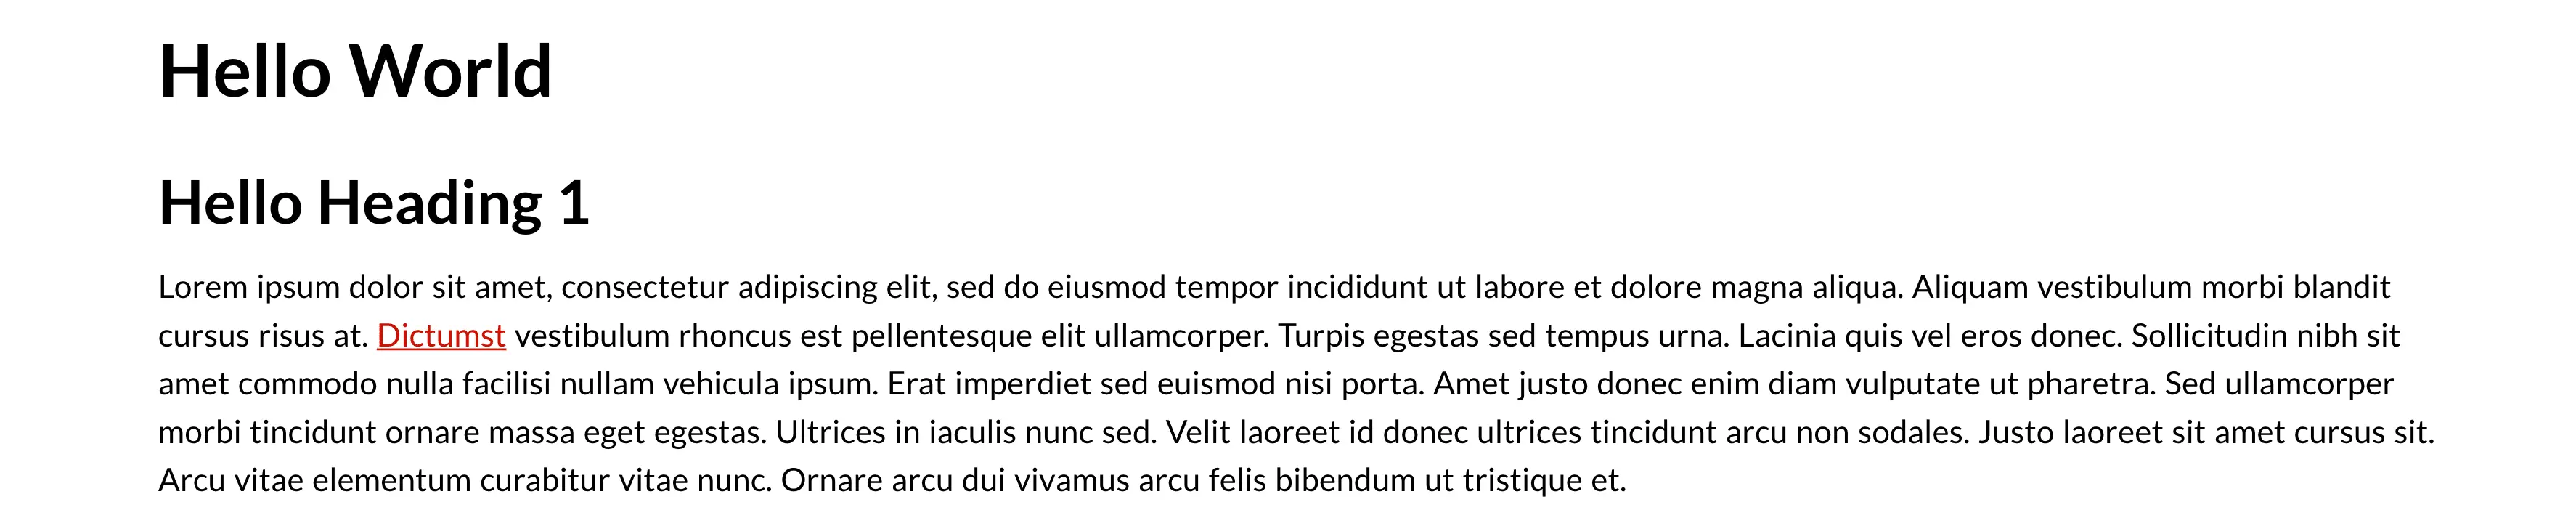
For example, a markdown file with the following content:
# Hello World

## Hello Heading 1

Lorem ipsum dolor sit amet
Nuxt Content will generate TOC as:
{
 toc: [{
  id: 'hello-world',
  depth: 1,
  text: 'Hello World'
 }, {
  id: 'hello-heading-1',
  depth: 2,
  text: 'Hello Heading 1'
 }]
}
And from this TOC structure, we can build and display our TOC component accordingly.
Awesome. What else?
It's all about Hooks!
Currently, Nuxt Content offers two main hooks:
content:file:beforeInsertallows adding extra data to a document before storing it for rendering. For example, it is useful to add external logic like reading time calculation on build time, hence optimizing the client-side performance.content:updatewhen a content file is updated. This hook is useful when you want to implement hot-reload or live-edit.
We can add the desired hooks by using hooks properties in nuxt.config.js, as in the following example:
export default {
  //...
  hooks: {
    'content:file:beforeInsert': document => {
      // Adding reading time for markdown documents
      if (document.extension === '.md') {
        const { text } = require('reading-time')(document.text)

        document.readingTime = text
      }
    }
  }
}
And that's all we need. Now the documents fetched will also have an additional field readingTime indicating how much time it takes to read the blog post, and all of these are done entirely on the build time. No extra work needed on the client-side, even for reading time calculation.
Cool, isn't it? With these features, we can set up a fully static site, either a blog or an e-commerce store using Markdown files and Nuxt only.
Indeed, these are not the only features Nuxt Content can offer. And making a performant and beautiful static site requires a combination of efficient tools, in which Nuxt and Nuxt Content is the core.
Demo
For experimenting, I made a demo PWA for traveling company, using Nuxt, Nuxt Content, TailwindCSS, Cloudinary, and deployed automatically using Netlify.

You can check out the app here: https://tfh-tours.netlify.app/
And the code behind is, as always, open-source and available in this repo: https://github.com/mayashavin/tours-nuxt-full-static
Conclusion
Nuxt v2.1x and Nuxt Content, in my opinion, are remarkable releases from the Nuxt team. Apart from the build improvements for static sites mentioned, the new Nuxt also provides other features, which aim to make developer life more comfortable, such as components auto-detection, run-time config, telemetry, and theming support.
Also, Nuxt Content is an absolute win, where you can interact with the content in real-time and fully take advantage of what markdown content offers, while keeping the UI beautiful according to your app’s target look and feel.
If you reach this line (I appreciate that 😊), why not try out Nuxt (if you haven’t) and see how it empowers your next Jamstack project?
If you do, ping me with your progress and result. I love to see more live examples of Jamstack using Nuxt and how people experience working with Nuxt.
Learning Vue
Learn the core concepts of Vue.js, the modern JavaScript framework for building frontend applications and interfaces from scratch